
Bean to Bar Chocolate 101: A Beginner's Guide to Mastering Home Chocolate Making
Author: Cocoa Craft
Have you ever bitten into a piece of artisan chocolate and wondered, "How did they make this taste so incredible?" Here's a little secret, you can create that same magic in your own kitchen. Yes, really!
Welcome to the wonderful world of bean-to-bar chocolate making. It's a craft that transforms humble cacao beans into silky, complex, absolutely swoon-worthy chocolate. And the best part? Anyone can learn to do it.
Whether you're a curious foodie, an aspiring chocolatier, or someone looking for a new creative outlet, this guide will walk you through everything you need to know to start your bean-to-bar journey. Let's dive in!
What Exactly Is Bean-to-Bar Chocolate?
Bean-to-bar chocolate is exactly what it sounds like, chocolate made from scratch, starting with raw cacao beans and ending with a finished bar in your hands. Unlike most commercial chocolate (which uses pre-processed couverture), bean-to-bar makers control every single step of production.
Why does this matter? Because complete control means complete flavor.
When you make chocolate from the bean up, you decide how dark to roast, how long to conch, and what flavors to highlight. You're not just melting and molding, you're crafting something uniquely yours. It's the difference between reheating takeout and cooking a meal from scratch with ingredients you selected yourself.
The Magic Behind the Process: Why Bean-to-Bar Tastes Different
Mass-produced chocolate prioritizes consistency and cost. Bean-to-bar prioritizes character.
Every cacao origin carries its own personality. Beans from Madagascar might bring bright, fruity notes. Peruvian cacao could offer earthy, nutty undertones. Ecuadorian varieties often deliver floral complexity that dances on your tongue.
When you make bean-to-bar chocolate, you're not masking these characteristics, you're celebrating them. You're creating chocolate with depth, nuance, and a story worth telling.
Ready to write your own chocolate story? Let's break down the process step by step.
The Bean-to-Bar Journey: Your Step-by-Step Roadmap
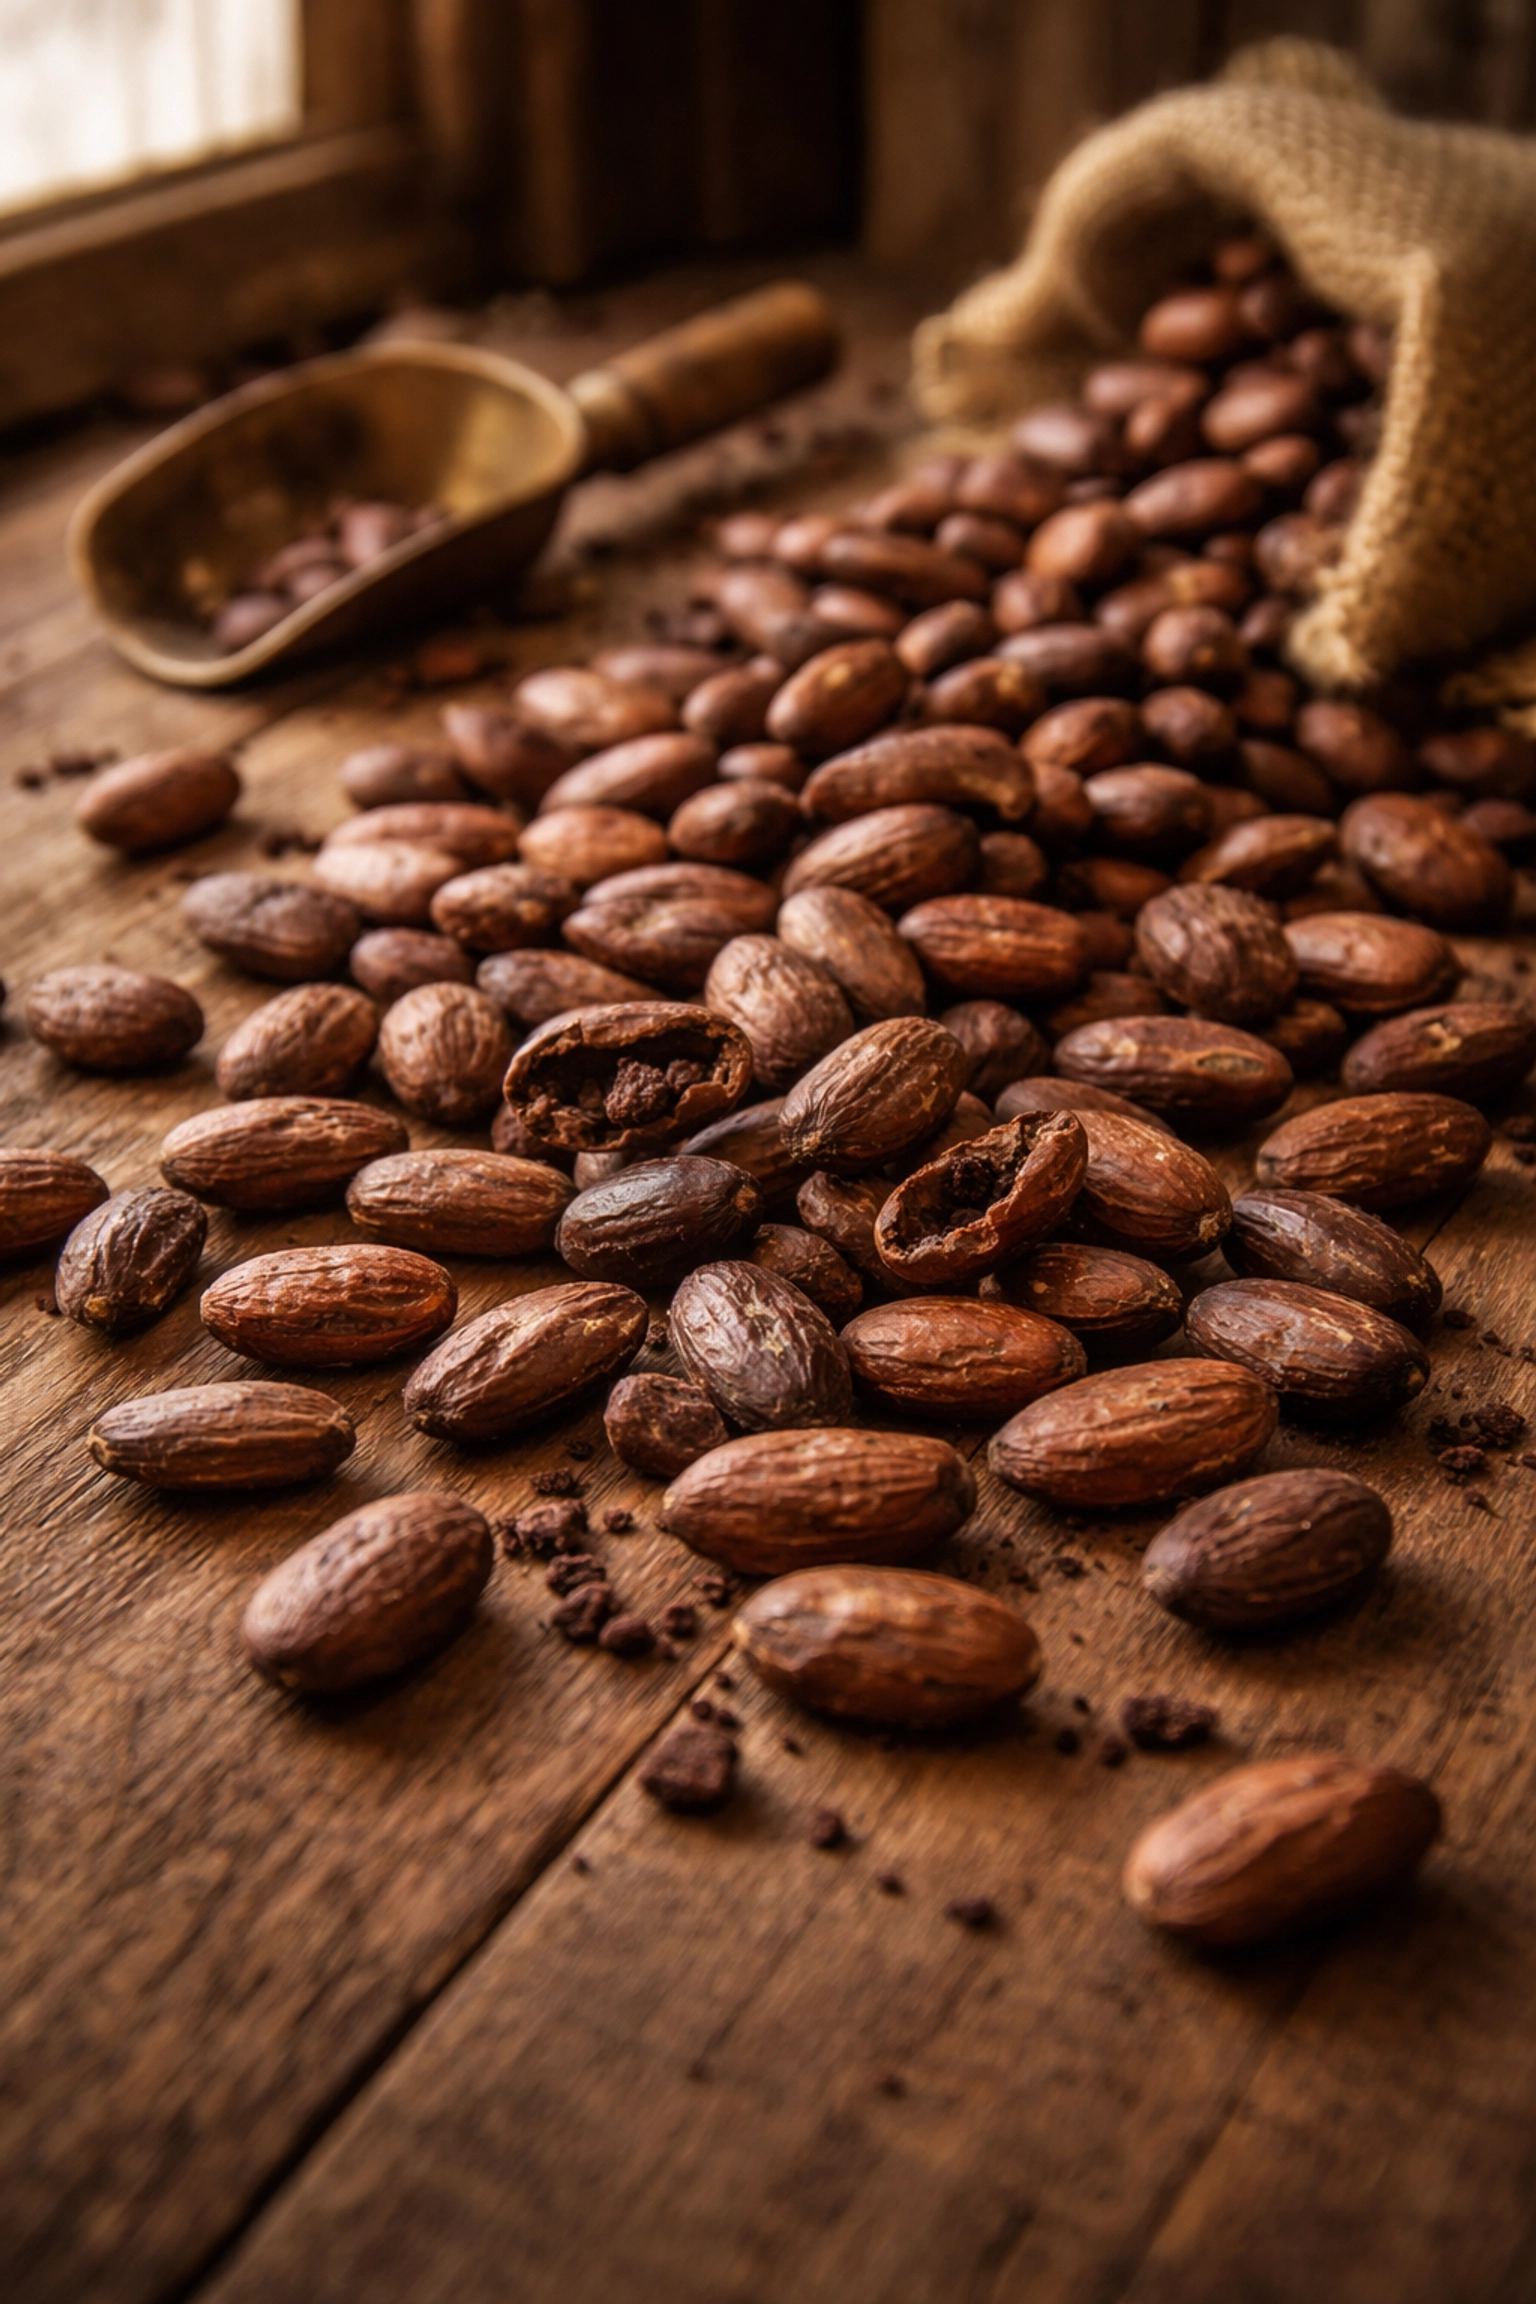
Step 1: Sourcing Quality Cacao Beans
Everything starts with the bean. And not all beans are created equal!
Look for fermented and dried cacao beans from reputable suppliers who work directly with farmers. Single-origin beans are fantastic for beginners because they let you taste the distinct terroir of a specific region. Think of it like choosing a wine, the origin shapes the experience.
Pro tip: Start with beans that are already properly fermented and dried. Fermentation is a complex process (2-7 days of carefully controlled conditions) that's typically handled at origin. Trust the farmers who've perfected this craft for generations!
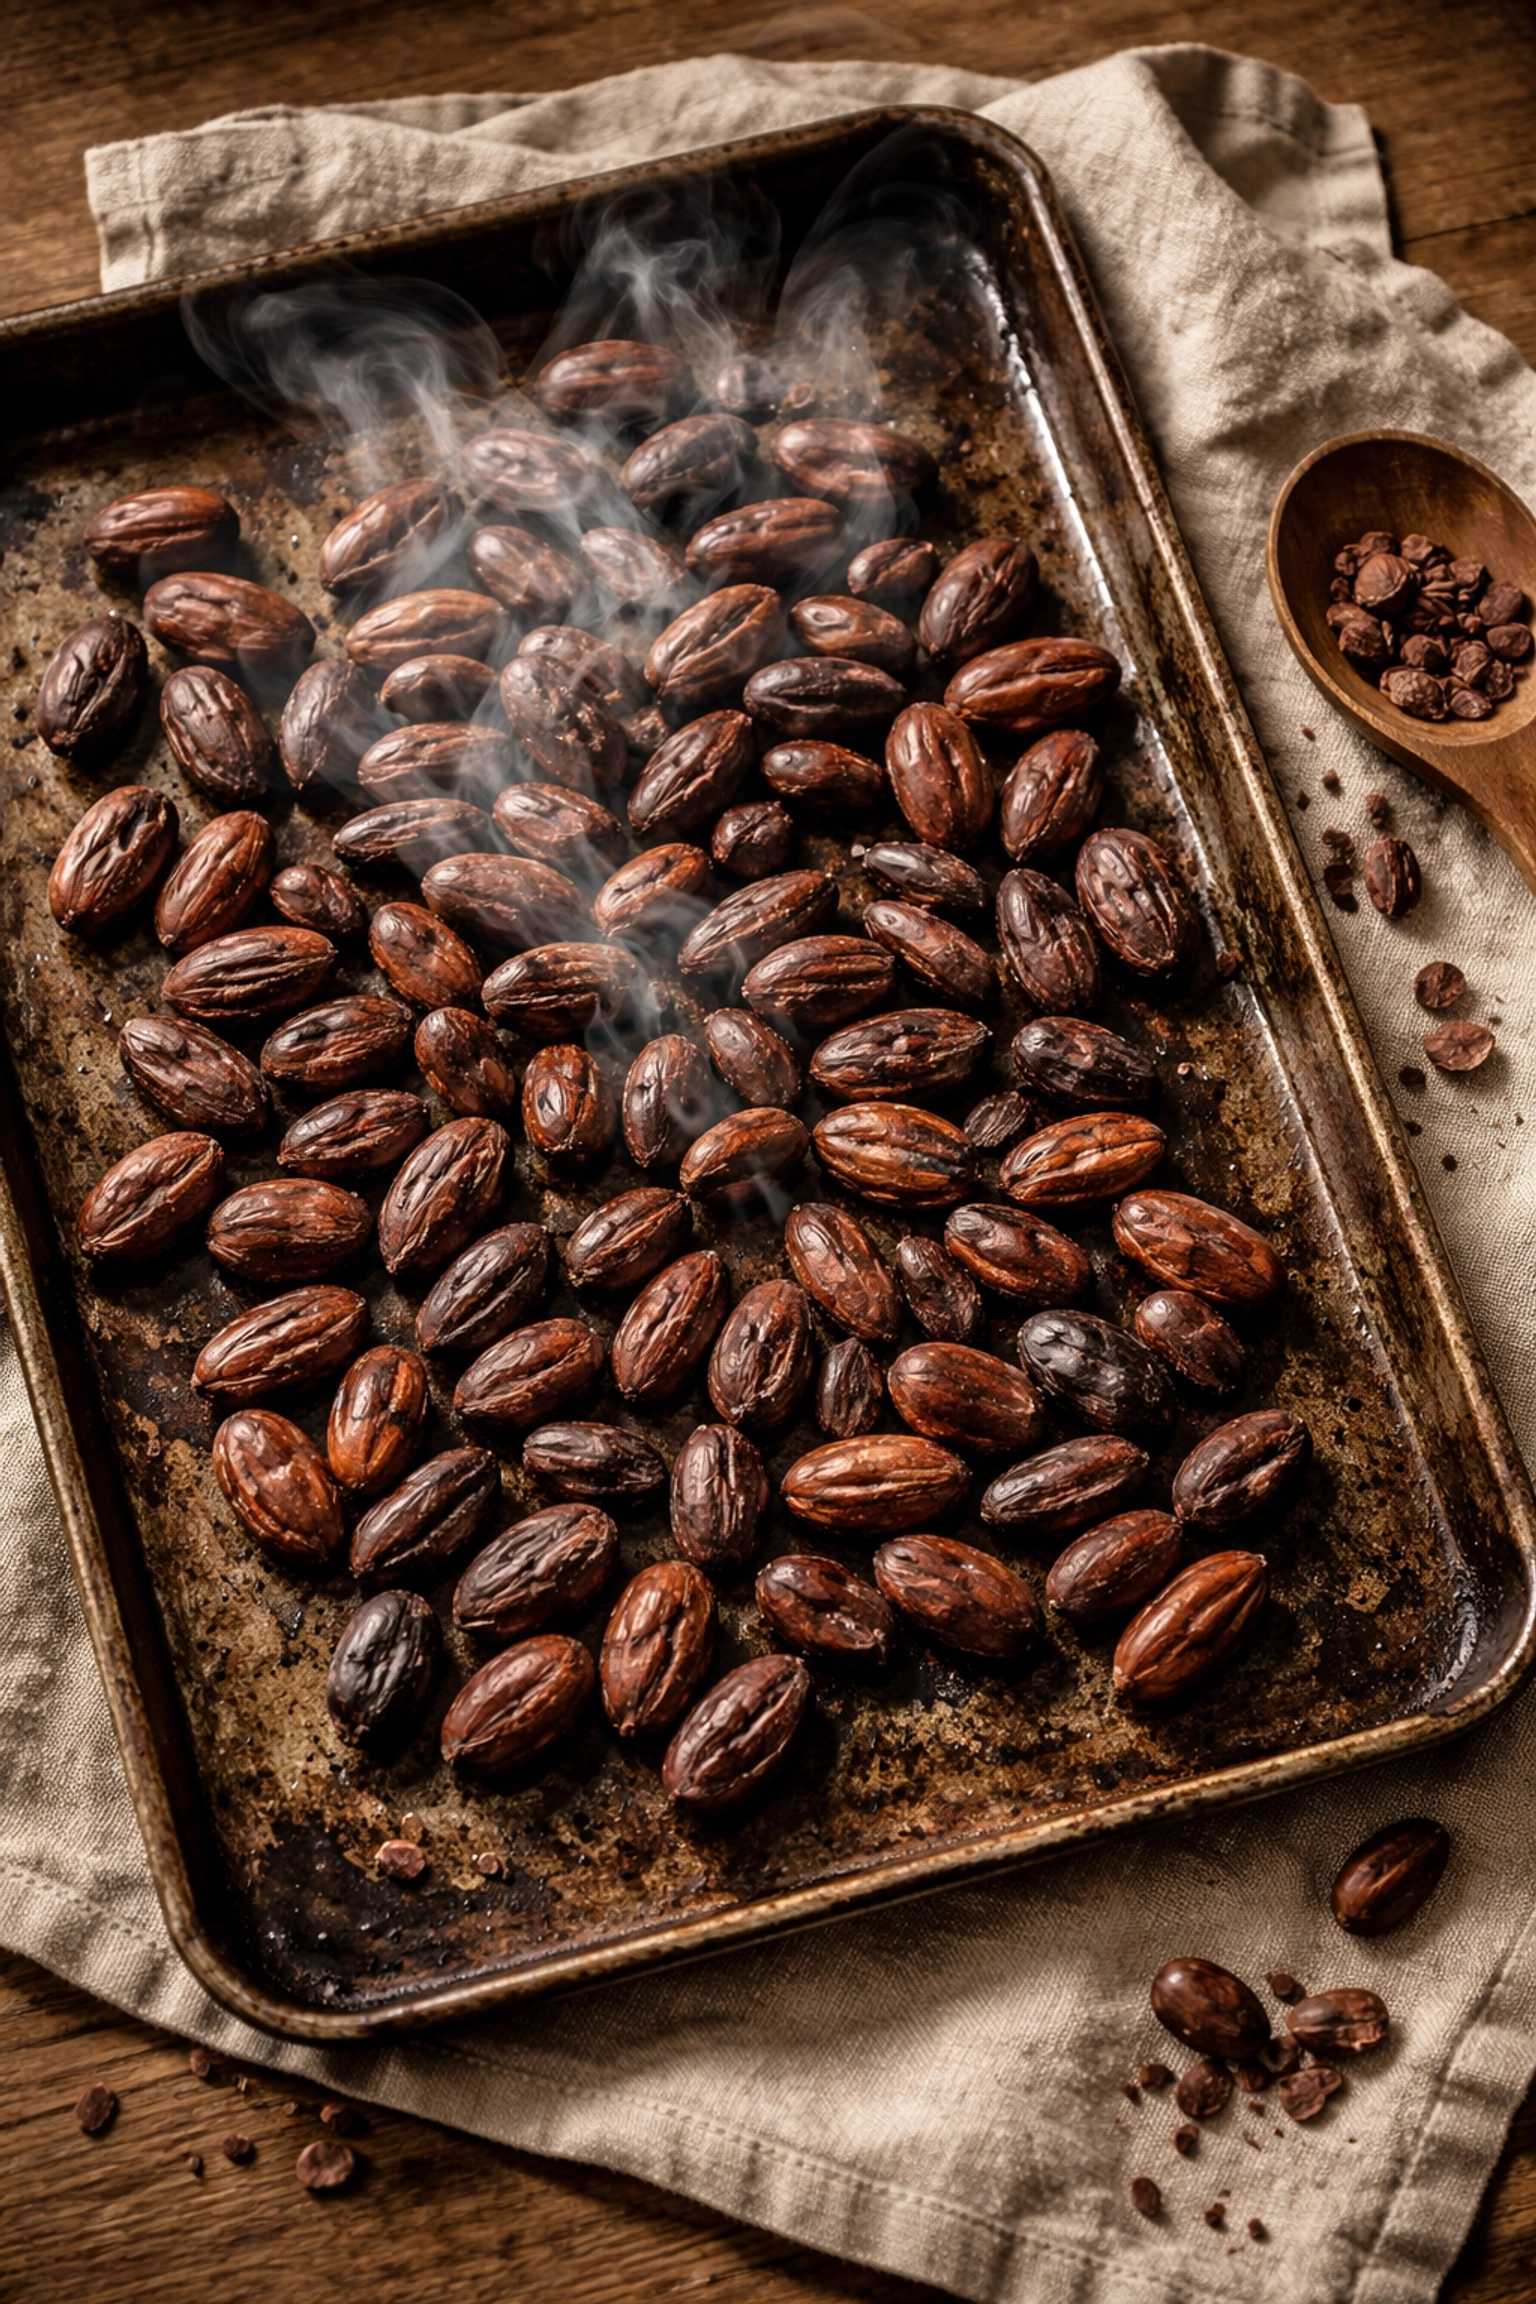
Step 2: Roasting, Where Flavor Comes Alive
Roasting is where the magic really begins. Heat transforms the chemical compounds in cacao, developing those rich, chocolatey flavors we all crave while eliminating any unwanted bacteria.
You can roast cacao beans in your home oven! Here's a simple approach:
- Preheat to 250-300°F (120-150°C)
- Spread beans in a single layer on a baking sheet
- Roast for 20-30 minutes, stirring occasionally
- Listen for the "crack", a popping sound indicating the shells are separating
Every origin benefits from slightly different roasting profiles. Lighter roasts preserve fruity, acidic notes. Darker roasts bring out deeper, more robust chocolate flavors. Experimentation is half the fun!
Step 3: Cracking and Winnowing
Once your beans are roasted and cooled, it's time to separate the good stuff (the nibs) from the not-so-useful stuff (the husks).
Cracking breaks the beans into smaller pieces. You can do this with a rolling pin, a Champion juicer, or even a hand-cranked grain mill.
Winnowing removes the papery shells from the nibs. At its simplest, you can use a hair dryer or fan to blow away the lighter husks while the heavier nibs fall into a bowl below. For larger batches, artisan winnowing machines make this process faster and more efficient.
Don't toss those husks, though! They make excellent garden mulch or a surprisingly delicious cacao tea.
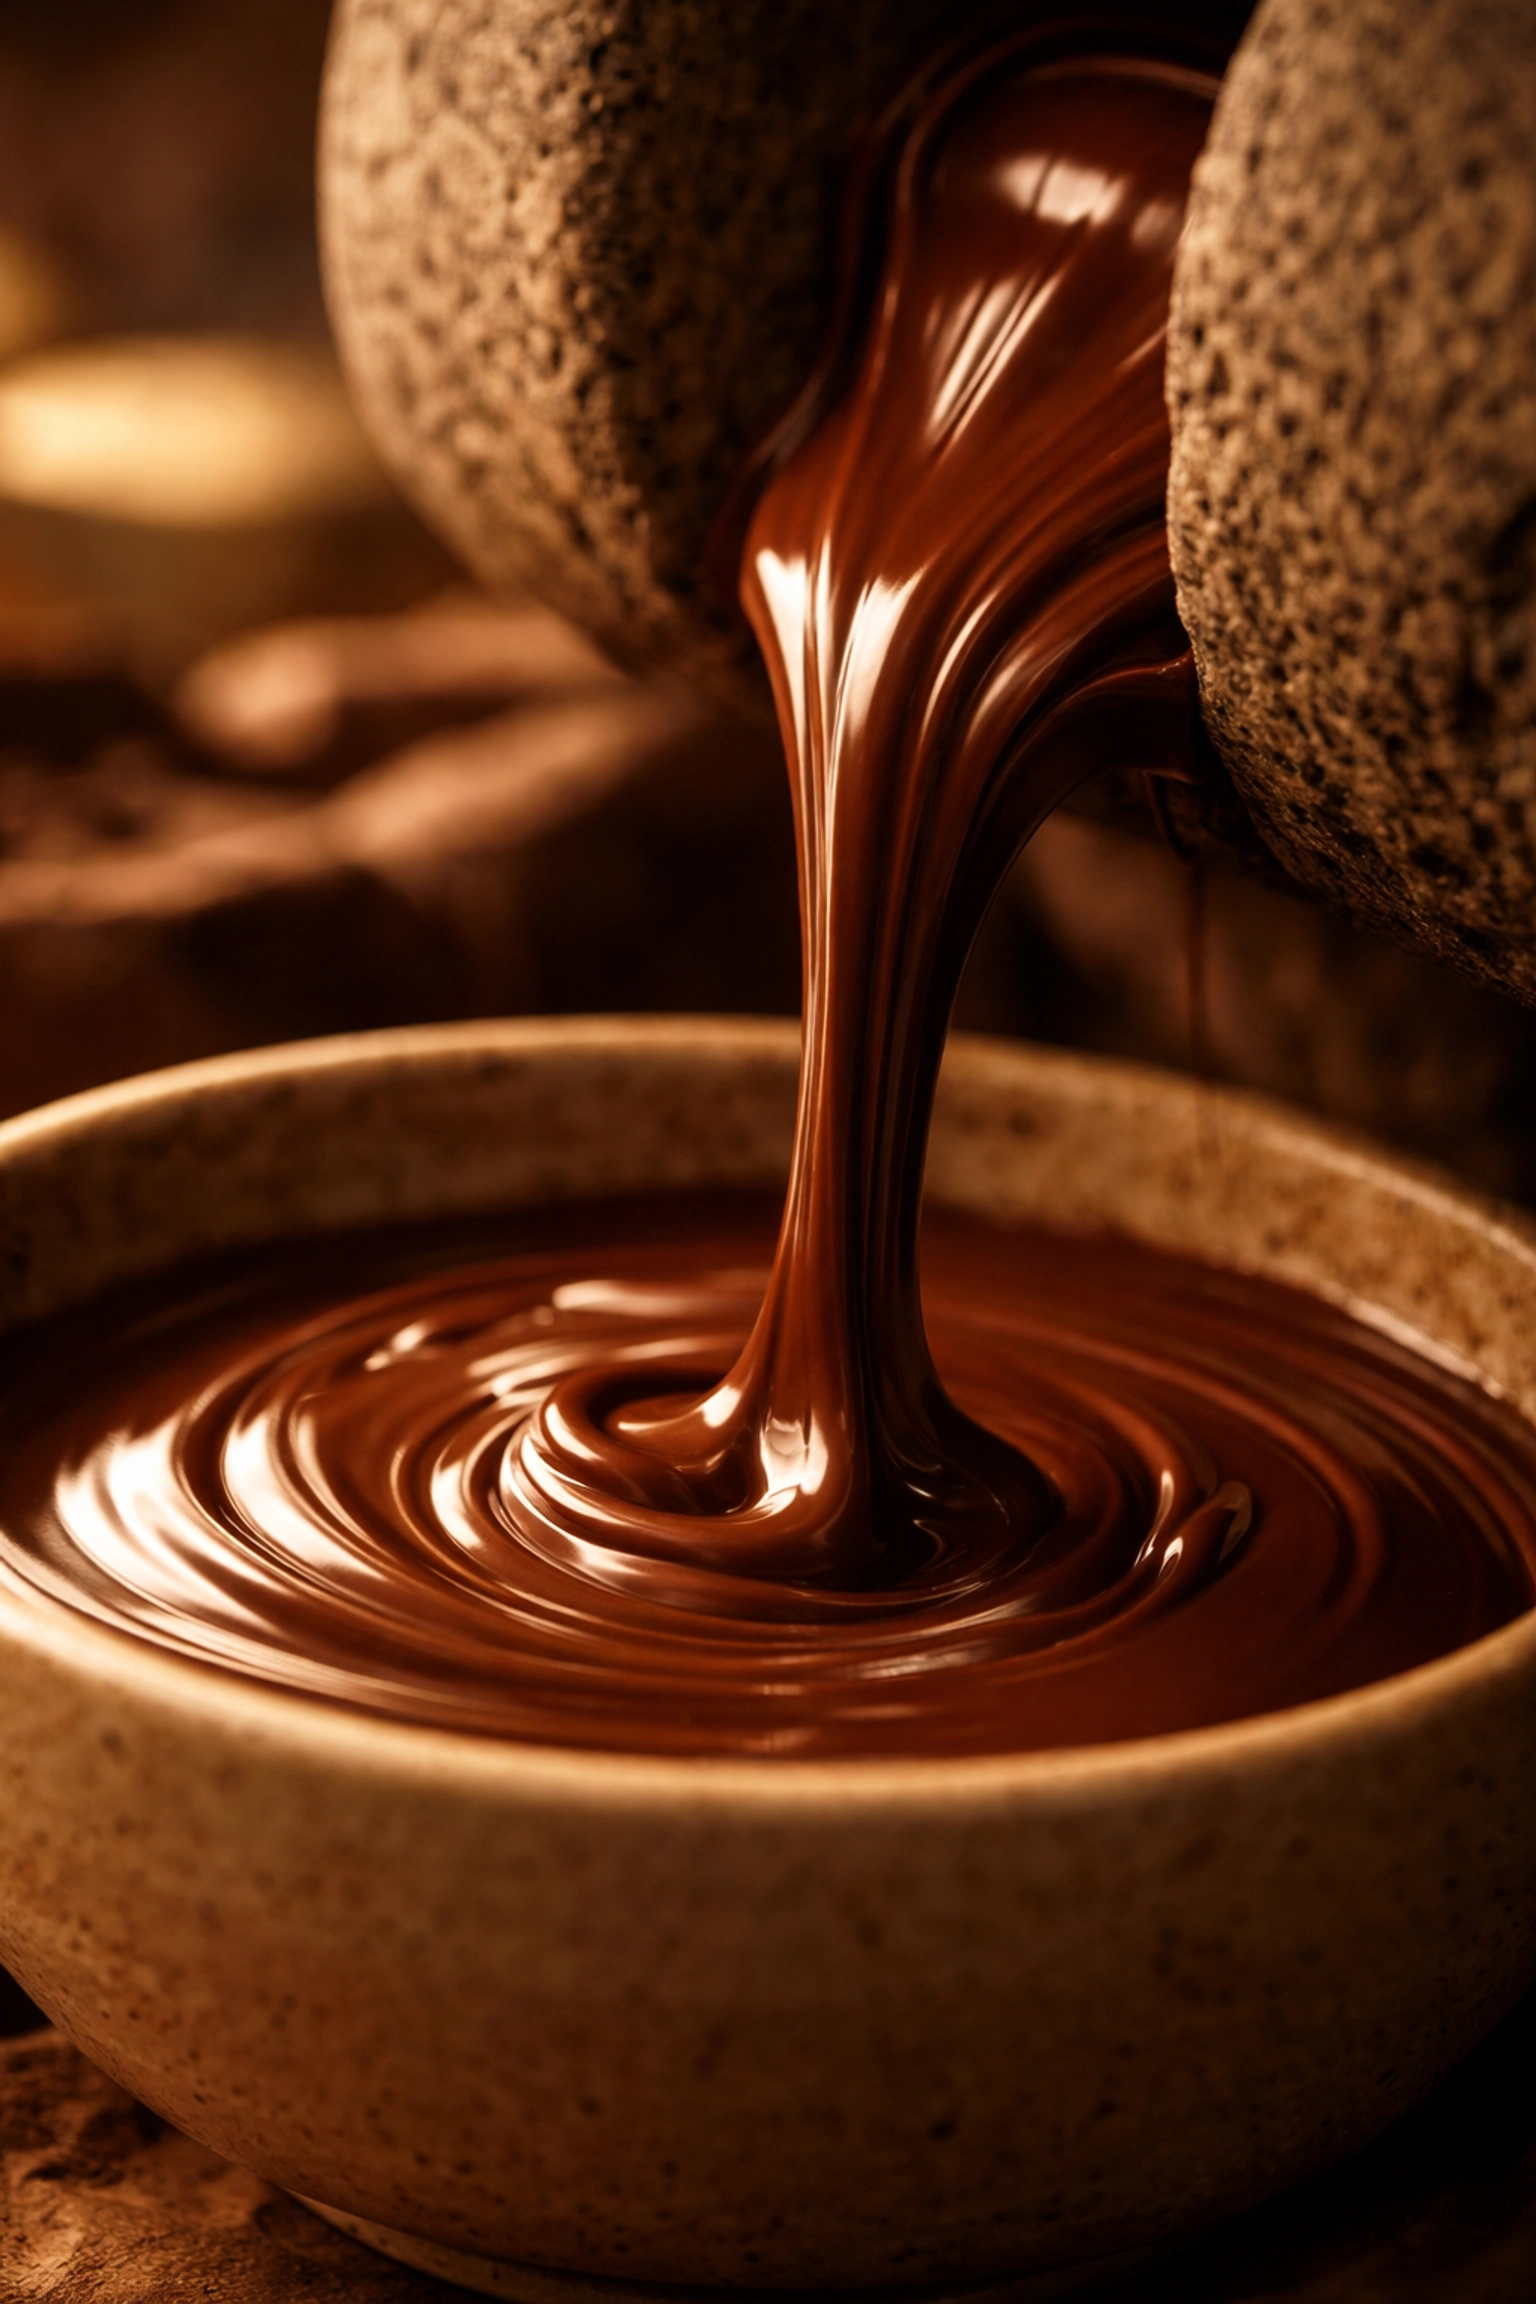
Step 4: Grinding, From Nibs to Liquid Gold
Here's where home chocolate making gets seriously satisfying.
When you grind cacao nibs, you're releasing the cocoa butter trapped inside. The friction generates heat, and those crunchy little nibs transform into a smooth, flowing liquid called cocoa mass or chocolate liquor (no alcohol involved, just pure cacao goodness).
A quality stone grinder or melanger is essential for this step. These machines use granite wheels to slowly refine the chocolate over hours, or even days. The result? Particles so fine (under 35 microns) that your tongue perceives only silky smoothness.
This is where you'll add your sugar, and optionally, ingredients like cocoa butter, vanilla, or milk powder if you're making milk chocolate.
Step 5: Conching, Patience Makes Perfect
Conching is the art of mixing, aerating, and heating your chocolate for extended periods. It might seem like "just stirring," but so much more is happening!
During conching:
- Volatile acids evaporate, reducing harshness
- Flavor compounds develop and harmonize
- Texture becomes increasingly smooth and velvety
Most home melangers handle both grinding and conching in one machine. Total processing time typically ranges from 24-72 hours, depending on your desired flavor profile and equipment.
Yes, patience is required. But trust us: the results are absolutely worth the wait.
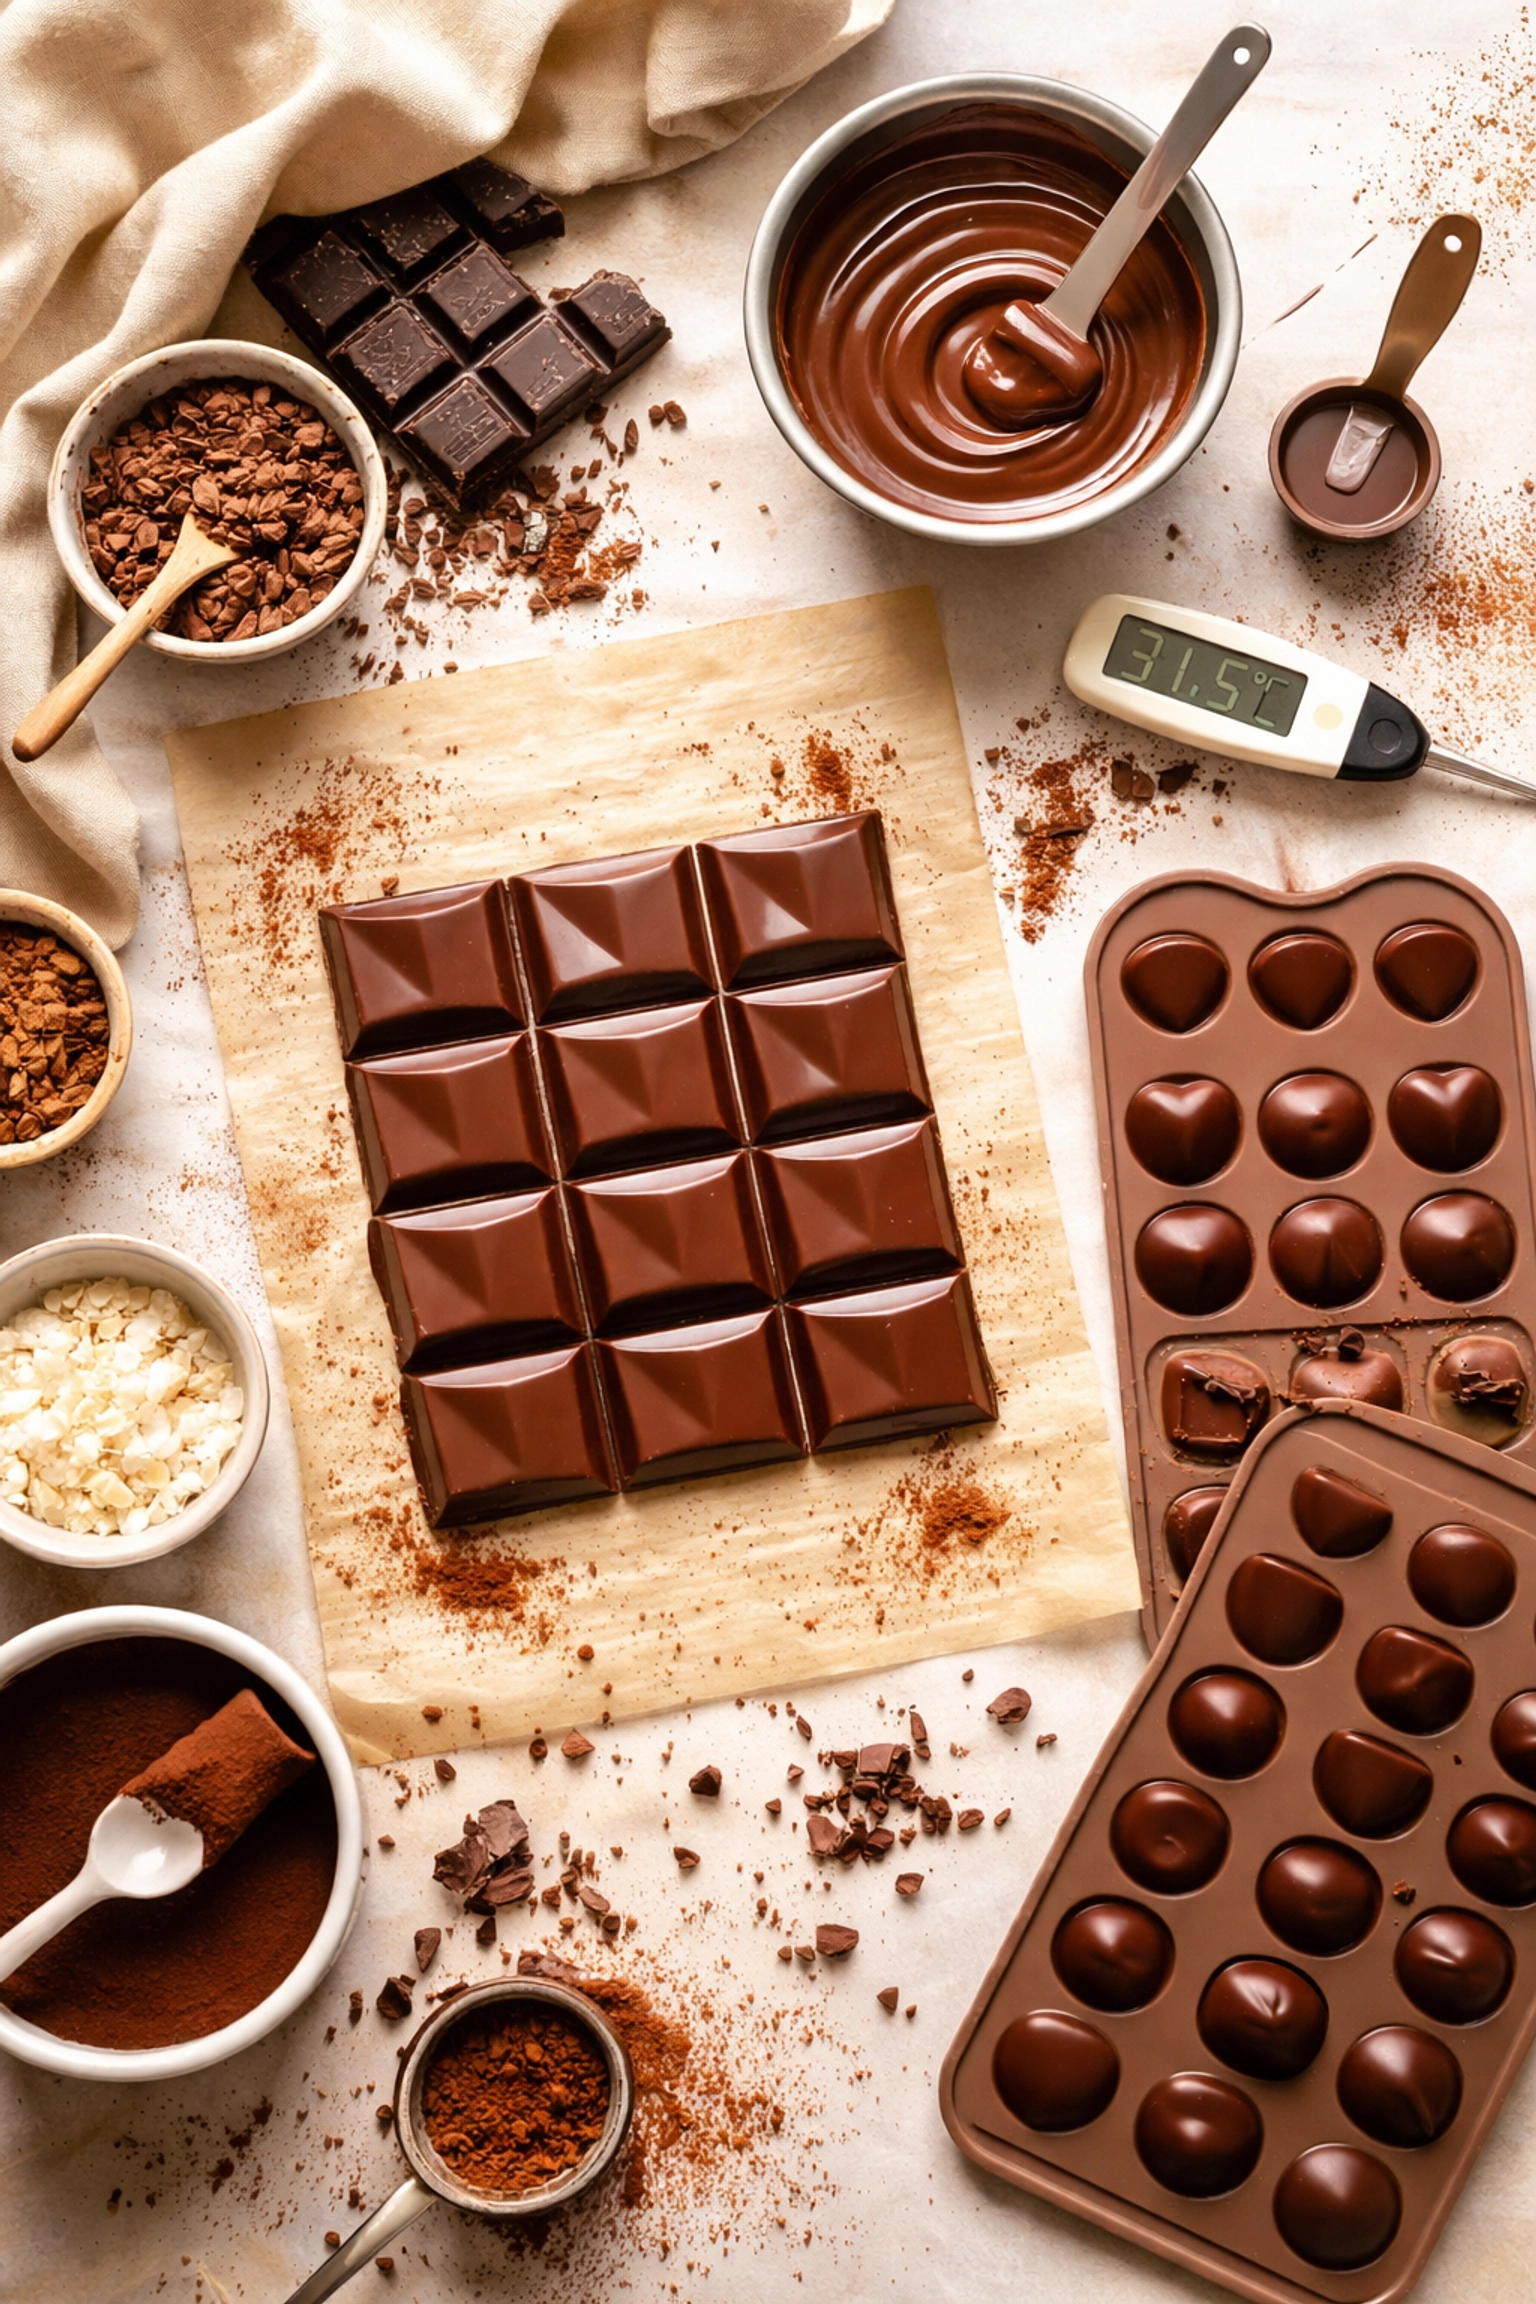
Step 6: Tempering: The Science of Snap
Ever wonder what gives professional chocolate that glossy shine and satisfying snap? That's proper tempering at work.
Tempering is a controlled heating and cooling process that organizes the cocoa butter crystals into a stable structure. Without it, your chocolate might bloom (develop white streaks), feel waxy, or lack that crisp bite.
The basic process involves:
- Heating chocolate to 115-120°F (46-49°C) for dark chocolate
- Cooling to about 82°F (28°C) while stirring
- Gently reheating to working temperature (88-90°F / 31-32°C)
A good thermometer and some practice are your best friends here. And don't worry if your first few batches aren't perfect: even experienced chocolatiers occasionally battle temperamental temper!
Step 7: Molding and Enjoying
Pour your beautifully tempered chocolate into molds, tap out air bubbles, and let it set in a cool place (not the refrigerator: too much moisture!).
Then comes the best part: unmolding your creation, breaking off a piece, and tasting chocolate you made yourself from actual cacao beans.
That first bite? Pure bliss.
Setting Up Your Home Chocolate Workshop
Getting started doesn't require a massive investment. Here's what beginners need:
Essential Equipment:
- Oven or dedicated roaster for roasting beans
- Cracking tool (rolling pin, grain mill)
- Winnowing setup (fan or hair dryer method works!)
- Stone grinder/melanger for grinding and conching
- Thermometer for tempering
- Molds for shaping
Nice to Have:
- Dedicated winnowing machine
- Tempering machine
- Vibrating table for removing air bubbles
Looking to explore professional-grade equipment? Visit our Cocoa Craft shop to discover stone grinders, winnowers, and everything you need to level up your chocolate-making game!
Your Digital Chocolate-Making Companion
Here's something exciting: you don't have to figure out recipes and ratios alone!
Our Formulation Tool helps you calculate perfect ingredient ratios for any chocolate style. Want to experiment with a 70% dark bar? A creamy 45% milk chocolate? The tool does the math so you can focus on the craft.
And if you love interactive learning, check out the Cocoa Craft Game Hub! It's a fun way to test your chocolate knowledge while taking breaks between batches.
Ready to Start Your Bean-to-Bar Adventure?
Making chocolate from scratch isn't just a hobby: it's a journey into one of the world's most beloved foods. You'll develop a deeper appreciation for craft chocolate, understand what makes quality beans special, and create treats that will absolutely impress anyone lucky enough to taste them.
So what are you waiting for?
Create your free Cocoa Craft account today to access our Recipe Builder, Formulation Tools, and connect with a community of passionate chocolate makers just like you. Already a member? Log in here and let's get crafting!
Your bean-to-bar journey starts now. Let's make something delicious together. 🍫